Actions available in Island
This page describes the available actions defined on top of the Island game engine. The execution of an action consumes time, modeled as action points. The game engine tells the player how much the action costed each time it responds to a given request, as a cost attribute. An action will never cost less than 1 action point (to ensure game termination), and the maximum cost is unbounded. External events (modeled as a random factor) might affect the actions, i.e., performing the same action twice might not cost the same.
Game Phase
The game contains two main phases:
- The aerial exploration phase, where a drone can fly over the map to collect relevant information, preparing the second phase;
- The ground exploration phase, where a boat full of explorers lands on the Island to collect resources.
The intention of the first phase is to exploit cheap actions to identify where to land on the island and properly exploit the resources without wasting time moving the explorers on land. The second phase establish a campground on the island, and use mens to exploit the expected resources. Using the land action automatically moves from phase 1 to phase 2.
Action Summary
| Action | Phase | Cost Cat. | Influence factor |
|---|---|---|---|
FLY |
1 | cheap | the cost is almost constant |
HEADING |
1 | medium | the cost is almost constant |
ECHO |
1 | cheap | the cost is almost constant |
SCAN |
1 | medium | the cost is almost constant |
STOP |
1 & 2 | variable | the distance to the homeport |
LAND |
1 & 2 | expensive | the distance to the designed creek |
MOVE_TO |
2 | variable | number of mens, hostility of the environment (e.g., biomes, pitch) |
SCOUT |
2 | medium | terrain difficulty |
GLIMPSE |
2 | cheap | terrain difficulty and range |
EXPLORE |
2 | expensive | current tile difficulty |
EXPLOIT |
2 | expensive | tile difficulty and resource properties |
TRANSFORM |
2 | medium | recipe |
Phase #1: Aerial exploration
These actions are available during the aerial phase. The player commands a flying drone (i.e., a remotely controlled plane) to collect information about the map. The drone is a fast device, and as a consequence it moves over the map over a square representing 3x3 tiles.
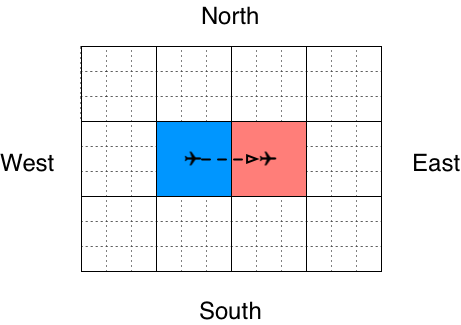
Moving the drone: FLY
This action move the drone forward, following its current heading. In the following picture, the drone is heading East, initially flying over the blue square. When asked to fly, it moves forward according to its current heading. You cannot fly outside of the map, i.e., reaching the boundary of the map will lost your radio connection with the homeport, making you unable to control the drone anymore.
- Request example:
{ "action": "fly" }
- Response example:
{ "cost": 2, "extras": {}, "status": "OK" }
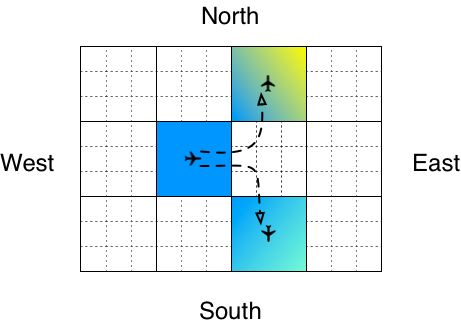
Changing direction: HEADING
This action changes the current heading of the drone. Like for flying, reaching the boundary of the map will lose your radio connection. In the following picture, the drone is initially heading East. When asked to go North, it change its heading and as it moves during the process (it’s a plane, not a helicopter), it ends in the upper position (yellowish). When asked to go South, it ends in the lower position (greenish). Like for flying, you cannot go outside of the map without losing the radio connection. Considering that you are controlling a plane, you cannot change heading to do a U-turn: with an initial heading going East, you can only change your heading to North or South.
- Request example:
{ "action": "heading", "parameters": { "direction": "N" } }{ "action": "heading", "parameters": { "direction": "S" } }
- Response example:
{ "cost": 4, "extras": {}, "status": "OK" }
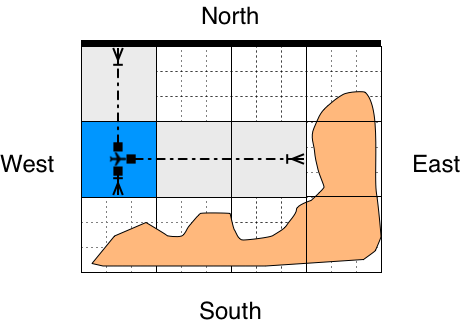
Using the radar: ECHO
The radar is used to check the presence of ground in a given direction. The radar can output two kind of information: in the best case it hits the island ground, and in the worst case it hits the boundary of the map. The radar analyser also output the range (i.e., the number of 3x3 squares) to cross to reach the detected element. One can only scan one direction at a time. The radar is not available at the rear of the plane, i.e, if the current heading is East, you can only use the radar with directions East, North or South. In the following picture, the land is depicted with the big orange unknown shape. Echoing to the East will answer 2, echoing to the South will answer 0. Echoing to the North will indicate that it reaches the out of range limit, within 1 square.
- Request example:
{ "action": "echo", "parameters": { "direction": "E" } }
- Response example:
{ "cost": 1, "extras": { "range": 2, "found": "GROUND" }, "status": "OK" }{ "cost": 1, "extras": { "range": 0, "found": "OUT_OF_RANGE" }, "status": "OK" }
Scanning the map: SCAN
The drone is equipped with an HD camera coupled to a ground analysis software. This software identifies relevant information about the Island, based on a picture of the 3x3 square under the plane. It reveals two different kind of information: (i) the major biomes identified in the picture (a biome must cover more than 20% of the picture to be identifiable) and (ii) acceptable landing points for a boat, so called creeks. Creeks are differentiated thanks to an unique identifier. This is the very same situation for emergency sites, identified as sites.
- Request example:
{ "action": "scan" }- Response example:
{"cost": 2, "extras": { "biomes": ["GLACIER", "ALPINE"], "creeks": [], "sites": []}, "status": "OK"}{"cost": 2, "extras": { "biomes": ["BEACH"], "creeks": ["id"], "sites": []}, "status": "OK"}{"cost": 2, "extras": { "biomes": ["BEACH"], "creeks": [], "sites": ["id"]}, "status": "OK"}
Phase #1 & 2: Landing, Stopping
Stopping the game: STOP
This action is used to stop the game engine. The semantics is to stop everything that happens on the island, and go back to the homeport.
- Request example:
{ "action": "stop" }
- Response example:
{ "cost": 3, "extras": {}, "status": "OK" }
Landing on the Island: LAND
The land action is initially a threefold action. First, it brings the drone back to the home port. Then, it equips a boat with explorers and sails from the homeport to the identified creek. Finally, the explorers disembark and establish the initial campground inside the creek. As a consequence, this operation is by nature quite expensive. During the landing, the player decide how many explorers will go to the island (at least one must stay on the boat to handle it). After the initial landing, asking another one will simply bring back the explorers on the boat, move the boat to another creek and then establish a new campground.
- Request example:
{ "action": "land", "parameters": { "creek": "id", "people": 42 }}
- Response example:
{ "cost": 15, "extras": { }, "status": "OK" }
Phase #2: Ground exploration
These actions are available after an initial landing on the Island.
Moving from a tile to another one: MOVE_TO
This action moves the current explorers present on the island to another tile, adjacent to the current one. The cost of this action is influenced by the terrain difficulty and the kind of biome (swimming to cross a lake is more difficult than waling in a clear forest) to be crossed during the move. You can move to any kind of tile (yes, even oceans …), the only limitation is to stay in the map or you’ll fall out of the world (and no circumfence will save you from this terrible fate).
- Request example:
{ "action": "move_to", "parameters": { "direction": "N" } }
- Response example:
{ "cost": 6, "extras": { }, "status": "OK" }
Scouting the adjacent tiles: SCOUT
A tile that is covered by a forest might not be a right place to produce wood. The scout action is dedicated to this very purpose, and retrieves information about the actual resources an adjacent tile can produce. It also gives you feedback about the altitude difference between the current tile and the scouted one (as altitude difference might influence moving costs). Scouting is more efficient (in terms of cost) with a team composed by a few explorers.
- Request example:
{ "action": "scout", "parameters": { "direction": "N" } }
- Response example:
{ "cost": 5, "extras": { "altitude": 1, "resources": ["FUR", "WOOD"] }, "status": "OK" }
Taking a glimpse of the horizon: GLIMPSE
This action allows the player to identify quickly the biomes to be encountered in a given direction. Semantically, it means to send one explorer on a nearby culminating point and ask her what is in front of her. The action is cheap, but does not deliver that much of information. One can ask a report up to 4 tiles (it costs obviously more to ask for 4 tiles than for 2), including the current one. The relevance of the information decreases with the distance to the current tile. For the two initial tiles, the report includes the percentage of the tile covered by each identified biomes. For the third one, it includes the identified biomes, without percentages. And for the fourth one, it only include the main biome. The action is less costly than a SCOUT, but only identifies biomes and not resources.
- Request example:
{ "action": "glimpse", "parameters": { "direction": "N", "range": 2 } }{ "action": "glimpse", "parameters": { "direction": "W", "range": 4 } }
- Response example:
{
  "cost": 3,
  "extras": {
    "asked_range": 4,
    "report": [
      [ [ "BEACH", 59.35 ], [ "OCEAN", 40.65 ] ],
      [ [ "OCEAN", 70.2  ], [ "BEACH", 29.8  ] ],
      [ "OCEAN", "BEACH" ],
      [ "OCEAN" ]
    ]
  },
  "status": "OK"
}
Exploring the current tile: EXPLORE
The exploration of the current tile gives to the player extensive information about the resources available for exploitation. When a given resource is available, this action identifies the associated exploitation conditions: the amount of ressources available (in high, medium or low) and the difficulty to exploit it (in harsh, easy, or fair). The exploration also gives information on the available point of interests, like creek identifiers. Exploring is more efficient (in terms of costs) with a team composed by few explorers (the time spent to coordinate the whole team can be dramatic with a lot of explorers).
- Request example:
{ "action": "explore" }
- Response example:
{
  "cost": 5,
  "extras": {
    "resources": [
      { "amount": "HIGH", "resource": "FUR", "cond": "FAIR" },
      { "amount": "LOW", "resource": "WOOD", "cond": "HARSH" }
    ],
    "pois": [{"kind": "Creek", "id": "43e3eb42-50f0-47c5-afa3-16cd3d50faff"}]
  },
  "status": "OK"
}
Exploiting a given resource: EXPLOIT
The exploitation of a resource is done on the current tile, using the mens available on the Island. The player cannot exploit a non-existing resource. The more a resource is exploited, the more it is time-consuming to extract it from the tile. This time (the cost of the action) depends on multiple factors: number of explorers (few mens exploit less resources, but too many will slow themselves), distance to the campground and terrain difficulty.
- Request sample:
{ "action": "exploit", "parameters": { "resource": "FUR" }}
- Response sample:
{ "cost": 3, "extras": {"amount": 9}, "status": "OK" }
Crafting manufactured resources: TRANSFORM
Manufactured resources can be crafted from basic ones. For example, to produce glass, the player has to combine wood (for the oven) and quartz. The action describes how many unit will be used in the process (among collected ones). The game engine will compute the amount of crafted resources and add it to the player stock.
- Request sample:
{ "action": "transform", "parameters": { "WOOD": 6, "QUARTZ": 11 }}
- Response sample:
{ "cost": 5, "extras": { "production": 1, "kind": "GLASS" },"status": "OK" }